You download a challenge file called vacation.png. It opens fine — blue sky, someone's thumb
accidentally in the corner, nothing obviously wrong. The description just says "look closer."
If you've spent any time in stego categories, you know that feeling. The image is the entire puzzle. Nobody is asking you to break AES. They're asking whether you know where data hides when it isn't supposed to be there at all.
Steganography is different from cryptography in one important way: the goal isn't always to scramble a message into gibberish. Sometimes the message stays readable — it's just placed somewhere your eyes skip over. In CTFs, that usually means one of three places: bytes appended after the file ends, the least significant bits of pixel channels, or both, which you confirm by inspecting bit planes.
This article walks through that triad the way most players actually work through a forensics image, not as a textbook chapter. Quick checks first, deeper inspection when the quick checks come up empty.
Before You Open a GUI: Thirty Seconds of Triage
I still start with the boring stuff, because it catches more than you'd think.
Run file vacation.png and confirm you're dealing with a real PNG and not a ZIP wearing
a costume. Check the file size — a 12 KB thumbnail of a beach shouldn't weigh 4 MB. Run
strings vacation.png and skim the tail. CTF authors love a clean ASCII flag sitting
after the image data, and strings finds it without any specialized tooling.
If the filename is suspicious — flag.jpg, secret.bmp, double extensions —
note it, but don't stop there. Plenty of legitimate-looking names carry payloads too.
Once triage is done, I move to the three techniques below in roughly this order: trailing data, then LSB extraction, then bit-plane visualization to understand why LSB extraction worked (or where to dig next).
Trailing Data: The Payload After "File Over"
Image formats have a logical end. PNG files finish with an IEND chunk; JPEGs end at the
EOI marker FF D9. Everything after that marker is, by definition, not part of the image
the viewer renders. And yet the bytes are still in the file on disk.
That's trailing data — sometimes called appended data or EOF steganography — and it's the fastest win in beginner stego challenges.
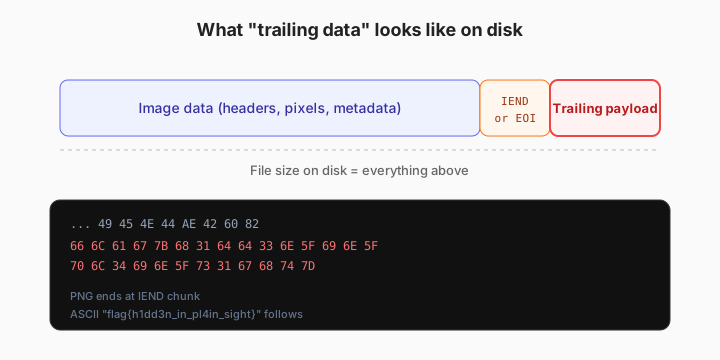
On Linux or macOS, compare reported size against what the format actually needs:
ls -l vacation.png
exiftool vacation.png | grep -i "file size"
xxd vacation.png | tail
If xxd shows readable ASCII after the PNG footer (49 45 4E 44 AE 42 60 82
is the standard IEND sequence), you've probably found the flag without doing anything clever. Tools like
binwalk and foremost also flag appended archives, second embedded files, or
raw text blocks.
A common CTF pattern: the visible PNG is a decoy, and a ZIP or second PNG is concatenated after it. Rename isn't magic — you still need to carve at the right offset — but knowing that extra bytes exist saves a lot of wandering.
Practical habit: when trailing data shows up as hex but not plain text, try decoding as Base64, rot13, or a reversed string before assuming compression. Authors layer one cheap transform on top of another.
LSB Encoding: Hiding Bits Where Eyes Don't Go
When trailing data checks out clean, the payload is probably inside the pixels themselves. LSB (Least Significant Bit) steganography replaces the last bit of each color channel with message bits. Change a pixel's red value from 182 to 183? The image looks identical. Do that across thousands of pixels and you can smuggle a short flag or a longer blob.
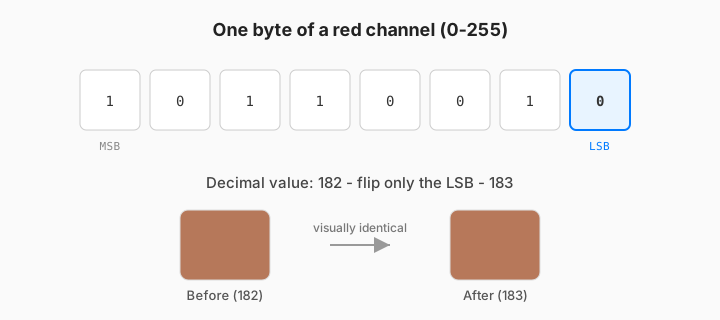
Typical CTF LSB schemes walk pixels left-to-right, top-to-bottom, pulling one bit per channel. RGB gives you three bits per pixel; RGBA gives four. Order matters — if extraction looks like garbage, try BGR, or only the red channel, or row-major vs. column-major traversal. The challenge description (or a hint cost) often narrows this down.
Manual extraction in Python is straightforward enough to be worth knowing, even if you normally reach for a script someone else wrote:
from PIL import Image

img = Image.open("vacation.png").convert("RGB")
bits = []
for r, g, b in img.getdata():
    bits.append(r & 1)
    bits.append(g & 1)
    bits.append(b & 1)

data = bytes(
    int("".join(map(str, bits[i:i+8])), 2)
    for i in range(0, len(bits) - 7, 8)
)
print(data[:200])
If the output starts with PK, you likely extracted a ZIP. If you see
flag{, stop and submit. If it's still noise, check whether the author prepended a length
header, used 1-bit-per-red-channel-only, or XORed the stream with a repeating key — all common
variations on the same idea.
Bit Planes: Seeing the Hidden Layer
Extracting LSB blindly can feel like guessing. Bit-plane visualization makes the guesswork visible.
Every channel in every pixel is an 8-bit number. The bit plane at position 0 is the LSB layer; position 7 is the most significant bit. Render each bit as black or white and you get a grayscale image of that layer across the whole picture.
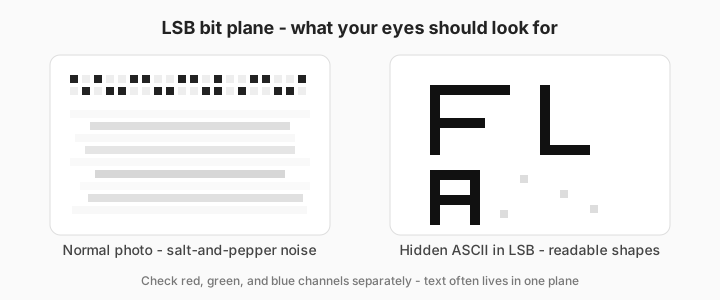
On a normal photograph, the LSB plane looks like static — almost random salt-and-pepper noise, because the low bits carry fine color variation you don't consciously notice. When someone encodes ASCII text into those bits, the plane develops structure: repeating vertical strokes, blocky regions, sometimes legible characters if the message is long enough or the image is large.
Always inspect red, green, and blue separately. Authors often embed in only one channel to leave the others untouched, and the hidden plane jumps out once you're looking at the right color. In harder challenges, higher bit planes (1 or 2) carry data while LSB stays noisy as misdirection.
Stegsolve, zsteg, and similar tools automate plane flipping. They're fast. But spending thirty seconds actually looking at the LSB plane teaches you what "structured noise" means — and that pattern recognition transfers to challenges where automation misdetects the channel order.
A Workflow That Doesn't Waste Time
Here's the sequence I use under time pressure:
- Metadata and strings. ExifTool for comments, GPS fields, thumbnail blobs.
stringson the whole file. - Trailing data scan. File size sanity check, hex tail, binwalk. Carve anything appended.
- LSB extract with defaults. RGB, row-major, 1 bit per channel. Inspect the first few hundred bytes.
- Bit-plane pass. View R/G/B LSB planes. If one channel shows structure, re-extract using only that channel.
- Variation sweep. Change bit order, skip alpha, try 2-LSB encoding, check for password-protected inner archives.
Steps 2 and 4 solve most beginner-to-medium stego in Jeopardy-style CTFs. Step 5 is where contests differentiate — steghide with a weak passphrase, custom Python encoders, images inside audio spectrograms (different category, same instinct: look where the format says "nothing to see here").
How the Three Techniques Relate
Trailing data and LSB aren't competing theories. They're different shelves in the same closet.
Trailing data hides outside the interpreted image stream. LSB hides inside pixel values but still within the format spec. Bit planes are how you see LSB (and near-LSB) manipulation without committing to an extraction order yet.
A fair challenge usually signals which family you're in. "The file is bigger than it should be" → trailing data. "The picture looks fine but something feels off" → LSB / bit planes. "We found noise in extraction" → wrong channel order, not wrong technique.
Common Traps (Learned the Hard Way)
Re-saving an image in an editor destroys both LSB payloads and trailing data. Work on copies. If a challenge gives you a PNG, don't open it in Preview, crop something, and export — you've just solved your own anti-challenge.
Lossy JPEG can carry trailing data reliably, but LSB in recompressed JPEG is messy because compression rewrites coefficients. When a JPEG challenge uses LSB, the image was often saved at high quality with minimal subsampling, or the data lives in the APP segments instead. PNG and BMP remain the honest formats for classic LSB tutorials.
Finally, not every stego challenge is stego. Sometimes the "image" is a QR code, a spectrogram screenshot, or a PNG that is also a valid polyglot PHP file. The triage mindset still applies — you're asking what the bytes are doing, not which single tool owns the category.
Putting It Together
Steganography in CTFs rewards patience more than exotic math. Trailing data catches the lazy hides. LSB extraction pulls out bit-level messages. Bit planes tell you whether you're on the right track before you burn an hour permuting channel orders.
If you want to practice all three on real files without wiring up scripts each time, we built StegInsight for exactly this workflow — trailing-data detection with hex preview, LSB embed/extract, and per-channel bit-plane views, running locally on iPhone, iPad, and Mac. It's the tool we wished we had during late-night forensics rounds: quick enough for contests, visual enough for learning.
Next time someone hands you a perfectly ordinary PNG and a vague hint, start at the end of the file. Then look at the last bit of every red pixel. The flag usually isn't far.